Ruby の場合、組み込みライブラリの net/http を使用すれば、如何ようにでもできるのだが、もう少し扱い易くシンプルなインターフェイスで操作したい。これまで、open-uri を拡張した rest-open-uri を使用していたのだが、heroku のクライアントで使われていた REST Client を使ってみることにした。
A simple REST client for Ruby, inspired by the Sinatra‘s microframework style of specifying actions: get, put, post, delete.
gem でインストールできる。
$ sudo gem install rest-client
Password:
Successfully installed rest-client-1.0.3
1 gem installed
Installing ri documentation for rest-client-1.0.3...
Installing RDoc documentation for rest-client-1.0.3...
Table of Contents
Open Table of Contents
REST リソースとのやりとり
REST リソースを提供するサーバの準備
まずは、サーバ側の準備をしておく。Rails プロジェクトで作成しておく。今回は、認証部分は考慮していない。
Rails プロジェクトを作成。
$ rails -d sqlite3 rest-test
$ cd rest-test
Scaffold を使って簡単な記事の投稿、表示、変更、削除ができるアプリケーションの雛形を作成する。
$ script/generate scaffold Article title:string content:text published_at:datetime
      exists  app/models/
      exists  app/controllers/
      exists  app/helpers/
      create  app/views/articles
      exists  app/views/layouts/
      exists  test/functional/
      exists  test/unit/
      create  test/unit/helpers/
      exists  public/stylesheets/
      create  app/views/articles/index.html.erb
      create  app/views/articles/show.html.erb
      create  app/views/articles/new.html.erb
      create  app/views/articles/edit.html.erb
      create  app/views/layouts/articles.html.erb
      create  public/stylesheets/scaffold.css
      create  app/controllers/articles_controller.rb
      create  test/functional/articles_controller_test.rb
      create  app/helpers/articles_helper.rb
      create  test/unit/helpers/articles_helper_test.rb
       route  map.resources :articles
  dependency  model
      exists    app/models/
      exists    test/unit/
      exists    test/fixtures/
      create    app/models/article.rb
      create    test/unit/article_test.rb
      create    test/fixtures/articles.yml
      create    db/migrate
      create    db/migrate/20090906091207_create_articles.rb
マイグレーションを行い、スキーマを生成しておく。
$ rake db:migrate
(in /Users/taka/work/rest-test)
==  CreateArticles: migrating =================================================
-- create_table(:articles)
   -> 0.0032s
==  CreateArticles: migrated (0.0035s) ========================================
サーバの起動。
$ script/server
=> Booting Mongrel
=> Rails 2.3.2 application starting on http://0.0.0.0:3000
=> Call with -d to detach
=> Ctrl-C to shutdown server
ブラウザから記事を 2 つほど登録しておく。
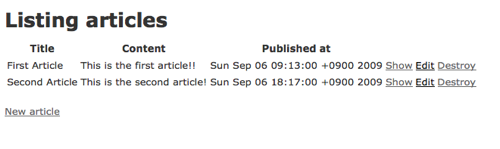
リソースを取得する
REST Client の RestClient.get で Article の一覧を取得する。
$ irb
>> require 'rubygems'
=> true
>> require 'rest_client'
=> true
>> RestClient.get 'http://localhost:3000/articles'
=> "<?xml version="1.0" encoding="UTF-8"?>\n
      <articles type="array">\n
        <article>\n
          <content>This is the first article!!</content>\n
          <created-at type="datetime">2009-09-06T09:13:46+09:00</created-at>\n
          <id type="integer">1</id>\n
          <published-at type="datetime">2009-09-06T09:13:00+09:00</published-at>\n
          <title>First Article</title>\n
          <updated-at type="datetime">2009-09-06T09:13:46+09:00</updated-at>\n
        </article>\n
        <article>\n
          <content>This is the second article!\r\n</content>\n
          <created-at type="datetime">2009-09-06T18:17:35+09:00</created-at>\n
          <id type="integer">2</id>\n
          <published-at type="datetime">2009-09-06T18:17:00+09:00</published-at>\n
          <title>Second Article</title>\n
          <updated-at type="datetime">2009-09-06T18:17:35+09:00</updated-at>\n
        </article>\n
      </articles>\n"
レスポンスとなっている XML の解析には、REXML を使用する。
>> require 'rexml/document'
=> true
>> doc_root = REXML::Document.new(RestClient.get('http://localhost:3000/articles')).root
=> articles typearray ....
>> doc_root.elements.each('//article') do |article|
?>   puts [
?>     article.elements['id'].text,
?>     article.elements['title'].text,
?>     article.elements['content'].text
>>   ].join(':')
>> end
1:First Article:This is the first article!!
2:Second Article:This is the second article!
=> [article .... , article .... ]
この後、いろいろ試してみるにあたり、投稿一覧を取ってくるメソッドがあると便利なので、定義しておく。
>> require 'ostruct'
=> true
>> require 'time' # for Time.parse
=> true
>> def get_article_list
>>   doc_root = REXML::Document.new(RestClient.get('http://localhost:3000/articles')).root
>>   articles = []
>>   doc_root.elements.each('//article') do |article|
?>     art = OpenStruct.new
>>     art.resource_id = article.elements['id'].text.to_i
>>     art.title = article.elements['title'].text
>>     art.content = article.elements['content'].text
>>     art.published_at = Time.parse article.elements['published-at'].text
>>     articles << art
>>   end
>>   articles
>> end
get_article_list で投稿一覧を取得する。
>> get_article_list
=> [#<OpenStruct published_at=Sun Sep 06 09:13:00 +0900 2009, resource_id=1, content="This is the first article!!", title="First Article">,
    #<OpenStruct published_at=Sun Sep 06 18:17:00 +0900 2009, resource_id=2, content="This is the second article!\n", title="Second Article">]
リソースを更新する
RestClient.put を使って 2 番目の投稿の本文を更新してみる。
>> article2 = get_article_list[1]
=> #<OpenStruct published_at=Sun Sep 06 18:17:00 +0900 2009, resource_id=2, content="This is the second article!\n", title="Second Article">
>> RestClient.put(
?>   "http://localhost:3000/articles/#{article2.resource_id.to_s}",
?>   :article => { :content => "#{article2.content} Changed" })
RestClient::RequestFailed: HTTP status code 422
エラーコード 422 は、Unprocessable Entity になる。サーバ側のログを覗いてみると、
Processing ArticlesController#update (for 127.0.0.1 at 2009-09-07 00:13:06) [PUT]
  Parameters: {"article"=>{"content"=>" Changed"}, "id"=>"2"}

ActionController::InvalidAuthenticityToken (ActionController::InvalidAuthenticityToken):
送信したリクエストの中に、CSRF 対策のために Rails で使用されている AuthenticityToken が無いためだ。
今回は、AuthenticityToken のトークンチェックは行わずに、検証を続ける。
app/controllers/articles_controller.rb に以下の記述を追加し、トークンチェックを省略する。
class ArticlesController < ApplicationController
  skip_before_filter :verify_authenticity_token
再度クライアントから更新を行う。
>> RestClient.put(
?>   "http://localhost:3000/articles/#{article2.resource_id.to_s}",
?>   :article => { :content => "#{article2.content} Changed" })
=> " "
>> get_article_list
=> [#<OpenStruct published_at=Sun Sep 06 09:13:00 +0900 2009, resource_id=1, content="This is the first article!!", title="First Article">,
#<OpenStruct published_at=Sun Sep 06 18:17:00 +0900 2009, resource_id=2, content="This is the second article!\n Changed", title="Second Article">]
更新されたようだ。
サーバ側のログも確認してみる。
Processing ArticlesController#update (for 127.0.0.1 at 2009-09-07 00:22:03) [PUT]
  Parameters: {"article"=>{"content"=>"This is the second article!\n Changed"}, "id"=>"2"}
  Article Load (0.2ms)   SELECT * FROM "articles" WHERE ("articles"."id" = 2)
  Article Update (0.7ms)   UPDATE "articles" SET "content" = 'This is the second article!
 Changed', "updated_at" = '2009-09-07 00:22:03' WHERE "id" = 2
Completed in 12ms (View: 1, DB: 1) | 200 OK [http://localhost/articles/2]
リソースを新規に追加する
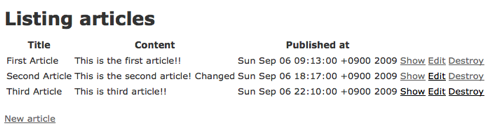
RestClient.post を使って新規に投稿する。
>> RestClient.post(
?>   "http://localhost:3000/articles",
?>   :article => { :title => "Third Article", :content => "This is third article!!",
?>     :'published_at(1i)' => "2009", :'published_at(2i)'=> "9", :'published_at(3i)'=> "6",
?>     :'published_at(4i)' => "22", :'published_at(5i)' => "10"})
=> "<?xml version="1.0" encoding="UTF-8"?>\n
      <article>\n
        <content>This is third article!!</content>\n
        <created-at type="datetime">2009-09-07T00:33:11+09:00</created-at>\n
        <id type="integer">3</id>\n
        <published-at type="datetime">2009-09-06T22:10:00+09:00</published-at>\n
        <title>Third Article</title>\n
        <updated-at type="datetime">2009-09-07T00:33:11+09:00</updated-at>\n
      </article>\n"
新規に追加されたようだ。DB の id も新規に 3 が採番されている。
サーバ側のログも確認してみる。
Processing ArticlesController#create (for 127.0.0.1 at 2009-09-07 00:33:11) [POST]
  Parameters: {"article"=>{"title"=>"Third Article", "published_at(1i)"=>"2009", "content"=>"This is third article!!", "published_at(2i)"=>"9", "published_at(3i)"=>"6", "published_at(4i)"=>"22", "published_at(5i)"=>"10"}}
  Article Create (37.3ms)   INSERT INTO "articles" ("updated_at", "title", "content", "published_at", "created_at") VALUES('2009-09-07 00:33:11', 'Third Article', 'This is third article!!', '2009-09-06 22:10:00', '2009-09-07 00:33:11')
Completed in 51ms (View: 2, DB: 37) | 201 Created [http://localhost/articles]
当然ながら、ブラウザで確認してみても、これまでの作業の内容が確認できる。
リソースを削除する
RestClient.delete を使って投稿を削除する。
1 番目に投稿したリソースの削除を行う。
>> article1 = get_article_list[0]
=> #<OpenStruct published_at=Sun Sep 06 09:13:00 +0900 2009, resource_id=1, content="This is the first article!!", title="First Article">
>> RestClient.delete "http://localhost:3000/articles/#{article1.resource_id.to_s}"
=> " "
>> get_article_list
=> [#<OpenStruct published_at=Sun Sep 06 18:17:00 +0900 2009, resource_id=2, content="This is the second article!\n Changed", title="Second Article">,
    #<OpenStruct published_at=Sun Sep 06 22:10:00 +0900 2009, resource_id=3, content="This is third article!!", title="Third Article">]
確かに削除されている。
サーバ側のログも確認する。
Processing ArticlesController#destroy (for 127.0.0.1 at 2009-09-07 00:47:24) [DELETE]
  Parameters: {"id"=>"1"}
  Article Load (0.2ms)   SELECT * FROM "articles" WHERE ("articles"."id" = 1)
  Article Destroy (0.6ms)   DELETE FROM "articles" WHERE "id" = 1
Completed in 10ms (View: 1, DB: 1) | 200 OK [http://localhost/articles/1]
REST Client のそれ以外の特徴
HTTP のベーシック認証
HTTP のベーシック認証にも対応している。リソースの前に <account id>:<password>@ を追加してあげればよい。
以下は、delicious で最後にブックマークを追加した時間を取得する API を叩いた例。
>> RestClient.get 'https://taro:password@api.del.icio.us/v1/posts/update'
=> "<?xml version="1.0" encoding="UTF-8"?>\n
      <update time="2009-09-06T07:23:43Z" inboxnew="0"/>\n
      <!-- fe10.feeds.del.ac4.yahoo.net compressed/chunked Sun Sep  6 09:09:45 PDT 2009 -->\n"
ロギング
RestClient.log= にて、ログのファイル名、または stdout、stderr も指定できる。
以下は、stdout を指定した例。
>> RestClient.log = 'stdout'
=> "stdout"
>> RestClient.get 'https://taro:password@api.del.icio.us/v1/posts/update'
RestClient.get "https://drtaka:fastone13@api.del.icio.us/v1/posts/update"
# => 200 OK | text/xml 179 bytes
=> "<?xml version="1.0" encoding="UTF-8"?>\n
      <update time="2009-09-06T07:23:43Z" inboxnew="0"/>\n
      <!-- fe10.feeds.del.ac4.yahoo.net compressed/chunked Sun Sep  6 09:09:45 PDT 2009 -->\n"
ヘッダーの取得
RestClient::Response#headers でレスポンスの HTTP ヘッダーの取得が可能。
>> (RestClient.get 'http://localhost:3000/articles').headers
=> {:etag=>""33ccfb63496b854f2bd158a91962a48a"",
    :x_runtime=>"13",
    :content_type=>"application/xml; charset=utf-8",
    :cache_control=>"private, max-age=0, must-revalidate",
    :content_length=>"793",
    :connection=>"close",
    :date=>"Sun, 06 Sep 2009 16:17:11 GMT"}
その他
それ以外にも、プロキシの指定、restclient コマンドでの操作、など扱い易いインターフェイスを揃えてくれている。以下の readme を参照。
参考サイト
- rest-client, fetch RESTful resources effortlessly
- LAB-5534: Rails REST
NetBeans を使って検証した例。 - delicious/help/api
- rest-client が便利 - あーありがち (2008-09-27)
- RestClient は 0.9 でヘッダが取れるようになってた - あーありがち (2009-04-05)
Comment
旧サイトの時にもらっていたコメント
Sidu on 17 Sep 17:56
Try Wrest: http://github.com/kaiwren/wrest
Example: class Article include Wrest::Components::AttributesContainer end
def self.get_articles
 'http://localhost:3000/articles'.to.uri.get.deserialise['articles'].map do |data|
    Article.new(data)
  end
end
Article.get_articles
Twitter example: http://github.com/kaiwren/wrest/blob/master/examples/twitter.rb
Contains loading Tweets, Twitter Users and posting Tweets.